
Underfloor heating offers energy efficiency, a comfortable and luxurious feel, and low maintenance costs. Those are just a few of the reasons why more people are choosing this way to heat their homes.
If you are considering installing underfloor heating yourself, with the right knowledge, experience and equipment there is nothing to stop you. We’ve put together this installation guide to help you, with information and tips including underfloor heating benefits, the various types of underfloor heating, a step-by-step outline for the installation itself, key considerations, safety reminders, and frequently asked questions.
To get started on your way to superior heating, read on.
Underfloor heating: A better way to heat your home
Let’s start with the basics - what exactly is underfloor heating?

Quite simply, underfloor heating is a heating system that heats your home from underneath your flooring. That’s right - it is installed beneath your flooring so you won’t need radiators. Most types of flooring - such as tiling, carpet or wood - will accommodate underfloor heating.
Underfloor heating conducts heat through your floor rather than using radiators or an HVAC system. If you have an electric underfloor system, electric cables will be installed in your floor, whereas if you have a hydronic (hot water) system, you will have a network of pipes in your floor.
Whether or not you need a boiler for underfloor heating will depend on the type of system you are installing. You can run electric underfloor heating without a boiler, whereas if you have a hydronic system (using hot water to heat your home), you are likely to need one. We’ll come onto the different types of underfloor heating in more detail further on in this guide, but first, what are the benefits?
The benefits of underfloor heating
You might be under the impression that underfloor heating is only a feature of high-end homes. But there are various benefits that properties of many different sizes can benefit from. These include:
Energy-efficiency
Whether you are using an electric or water-based underfloor heating system, they both provide warmth efficiently. It’s the consistency of underfloor heating - and the moderate temperature systems needed to reach to warm your home effectively - that make them superior to radiators, which have to achieve a higher heat in order to keep your warm.
Luxurious feel underfoot
You can tell immediately when you are in a home with underfloor heating. That soothing feeling under your feet that keeps you warm from the ground up means you can relax in comfort at any time of year, whether you have footwear on or not.
Low maintenance
Tired of bleeding radiators, or calling over an engineer to check on a faulty boiler? The options offered by underfloor heating give you various ways to reduce maintenance checks and running costs. Electric systems typically require next to no maintenance compared to traditional radiator systems, while you can also expect hot water underfloor heating to need servicing less frequently.
More space
With no radiators, underfloor heating can offer you more space in each room. That provides more freedom in design and decorations. Versatility - most conventional types of flooring can accommodate underfloor heating underneath - from tiles, to wood, laminate, carpet or stone. This means you won’t necessarily have to change your flooring for installation of an underfloor heating system.
Underfloor heating types
There are two main types of system, electric and hydronic (hot water):
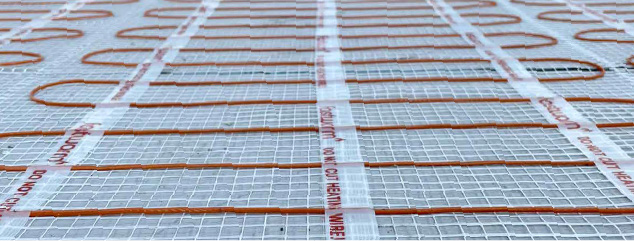
Electric Underfloor Heating
This type of heating system works by passing an electric current via heating cables - or alternatively wire mesh panels - under the floor. It can be installed under most floor coverings but tends to work most effectively with concrete or screed flooring, due to better heat conduction. Electric systems heat your home quickly and consistently. In general, running costs are higher than with hydronic systems.
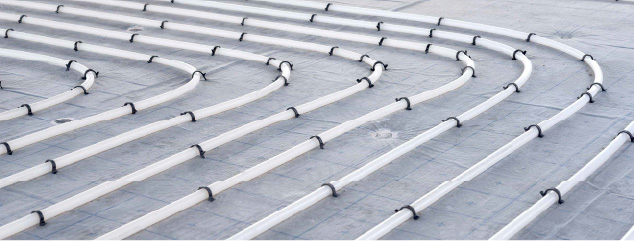
Hydronic Underfloor Heating
With this system, hot water is circulated through pipes that are installed under the floor. Hot water comes from a central boiler, and the pipes allow heat to be conducted through the flooring into the room. Hydronic systems can last for around a decade and typically require little maintenance.
How to install underfloor heating
Now we’ll outline the various stages of underfloor heating installation. The process differs according to the type of system - hydronic or electric - and we’ll cover both here:
Electric Systems
- The subfloor should be completely clean, so clear away any debris, dirt or dust.
- The subfloor should also be as level as possible. Don’t worry about minor dips or peaks, but address raised areas by sanding or using a self-levelling compound.
- Stick insulation foam around the perimeter of the room. Install the concrete substrate, measuring and cutting to size with a knife.
- Check the substrate is level, clean and smooth, ready to be tiled.
- Mark out permanent fixtures in the subfloor, including pipes.
- The electric cables of your underfloor heating system can now be installed.
- Secure connections between the power supply leads and wire leads - you can do this with duct tape.
More detailed instructions for electric underfloor heating system installation are here in our FastGrid System manual.
Hydronic Systems
- Clean the subfloor and remove any obstacles or sharp edges that may damage the pipes.
- Lay a damp-proof membrane - which is a large plastic sheet that acts as insulation that stops heat escaping downwards.
- If you have traditional joists, you may need to drill holes in joists to allow tubing to pass through. Truss-style joi ts typically used in modern construction may not require this step.
- Install the manifold - this is the central distribution point for the hot water, connecting the pipes to the heat source (not needed for electric systems).
- Pipes can now be secured and fitted in a uniform network, typically 200mm apart. Install insulation such as fiberglass batts or mineral wool.
- You can use flooring chipboard directly above the pipe insulation to provide a solid base for the flooring above. Chipboard can be pushed together using their tongues and grooves.
- Some systems use spreader plates - aluminium sheets that are added above pipes for heat transfer. More on installing them in this video. Your plumbing connections will need to connect the system to your boiler (feed pipes).
You can take a look at more detailed guidance for installing a hydronic underfloor heating system in our Water System manual.
Key considerations
Here are some other things to bear in mind when installing your system:
Follow manufacturer’s instructions
Your installation plan shouldn’t deviate from the manufacturer’s instructions. It’s important that you follow this guidance to ensure that your particular system is installed as intended.
Know your floor’s limitations
It is essential that you know the heat limitations of your flooring. Certain materials such as wood will have restrictions on the temperatures your system can reach. Understand these limits and ensure that the system you are using has the right certifications to be used with your floor.
Remember the importance of insulation
Using correct insulation can help to make your underfloor heating system much more efficient. Not only can this result in lower energy bills and is better for the environment, but it can also reduce the warm-up time and allow your home to heat up more quickly.
Warm-up times
In general, an electric underfloor heating system will warm up more quickly than a hydronic one. However, using thermostats and zoning, you can set hydronic systems to ensure the various rooms of your house are warm exactly when you want them.
Thinner flooring
If you are in the process of constructing or refurbishing your home, or wish to replace your existing flooring, you should consider the best type of surface for your system. Some surfaces - such as stone or tiles - have better thermal conductivity than others. In general, thinner flooring will give you faster response times and better thermal output.
FAQs
Let’s round off this guide by answering some common queries on the process of installing underfloor heating:
How long does it take to install underfloor heating?
This will depend on various factors, such as the floor area covered and the system type, as well as if you are planning to install new flooring. In general, an installation can be completed in one to two weeks by an experienced installer. However, if you don’t have much experience and are attempting the installation as a DIY project, you can expect it to take longer.
Do I have to remove my existing flooring before I start?
Yes, any underfloor heating system installation will require access to the subfloor. Not only will this allow you to install the system, but you can also carry out necessary preparation, such as cleaning and levelling the subfloor, and adding insulation. Once you have finished the installation, you can replace the flooring (if that is possible with your flooring type) or install new flooring.
Will the height of my floor increase due to underfloor heating?
That depends on the type of installation. You can expect your floor height to be raised by some degree. However, this might not only be due to system elements such as pipe - a raised floor can also be due to insulation boards used. In general, your floor level won’t be raised by more than 1 or 2 inches.
That’s a wrap on our underfloor heating installation guide. We’ve given you an outline for the process - for more detailed advice, refer to our manuals.
If in doubt, have the job done by professional contractors. This is likely to save you time, and negate the risk of incorrect installation.